Setup
Download the OpenSSL binaries from this
location.
(Please note that version 1.0.2 works better in windows)
Extract the binaries at location:
The binaries will be downloaded in bin folder. Now create a demo folder at this location
Add the following location to windows PATH variable.
Create 2 Environment Variables:
set RANDFILE=C:\OpenSSL\demo\.rnd
set OPENSSL_CONF=C:\OpenSSL\bin\openssl.cfg
Open Command Prompt and type openssl. You should get a window like this:
This means that the setup is correct and complete. Else fix your windows PATH variable. Close this window.
Create a Root Certification Authority
Now we need to create a certificate for Root Certification Authority. Open Command Prompt and change location to
demo folder using command:
cd C:\OpenSSL\demo
Create key as (location: C:\OpenSSL\demo):
openssl genrsa -out RootCA.key 4096
Use this key to create a Root Certificate using command:
openssl req -new -x509 -days 7300 -key RootCA.key -out RootCA.crt
The certificate expiration is set to 20 years (7300 days). Change to match your requirements.
You will have to enter details as:
The certificate name is the input entered against field: Common Name
Please note that if you press enter without entering a value, the default value (value displayed in []) will be used to create certificate. The certificate
RootCA.crt will be created at location:
C:\OpenSSL\demo
This certificate will have to be installed in Trusted Root Certification Authority in any machine which the website is installed or used.
Create a Domain Certificate
Now we need to create a domain certificate. Create a folder
contoso at location:
C:\OpenSSL\demo
Create a file csr_detail.cnf using the details below in
contoso folder:
[req]
distinguished_name = req_distinguished_name
req_extensions = v3_req

[req_distinguished_name]
countryName = US
countryName_default = US
stateOrProvinceName = New York
stateOrProvinceName_default = NY
localityName = New York
localityName_default = New York
organizationalUnitName = Contoso Unit
organizationalUnitName_default = Contoso Unit
commonName = contoso.com
commonName_default = contoso.com
organizationName = Contoso
organizationName_default = Contoso
commonName_max  = 64

[ v3_req ]
# Extensions to add to a certificate request
basicConstraints = CA:FALSE
keyUsage = nonRepudiation, digitalSignature, keyEncipherment
subjectAltName = @alt_names

[alt_names]
DNS.1 = www.contoso.com
DNS.2 = files.contoso.com
IP.1 = 0.0.0.0
Edit it to match your needs.
Open Command Prompt and change location to
contoso folder using command:
cd C:\OpenSSL\demo\contoso
Create a KEY for the certificate using the command:
openssl genrsa -out contoso.com.key 2048
Create a CSR file for the certificate using the command:
openssl req -new -out contoso.com.csr -key contoso.com.key -config csr_details.cnf
You will be asked to input fields as:
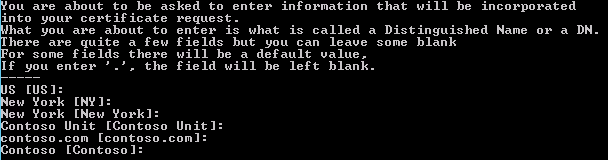
Press enter in each field to add default value already set from
CNF file.
Create a certificate using the CNF file, KEY and the CSR file using the command:
openssl x509 -req -days 3650 -in contoso.com.csr -CA ..\RootCA.crt -CAkey ..\RootCA.key -set_serial 01 -extensions v3_req -extfile csr_details.cnf -out contoso.com.crt
This certificate will be created as
contoso.com.crt at location:
C:\OpenSSL\demo\contoso
Now we need to create a PFX file so that this certificate can be imported in IIS. Use the following command:
openssl pkcs12 -export -out contoso.com.pfx -inkey contoso.com.key -in contoso.com.crt
You will be asked to enter a password (at least 4 characters) as:

Import this PFX file in IIS and use it in both the domains: www.contoso.com & files.contoso.com


